Saturday, July 31, 2010

Rosemary Scallops and Grits Recipe

We spent most of the day catching up on things that have to be done around the farm. You know, the "fun" stuff that you have to do, but you sure wish you could just twitch your nose and it be done for you?

Well, I've wiggled my nose every way to Sunday and my long list of things to do did not get magically done. If anything, my list just seemed to get longer.

I was so absorbed in all of my "getting done" that I completely lost track of time.

At 6:30 PM, my sweet husband walked through the door from a full day of working around the farm and asked me what was for dinner.

I was caught like a deer in the headlights.

Surely it wasn't that late already. I hadn't even thought about dinner.

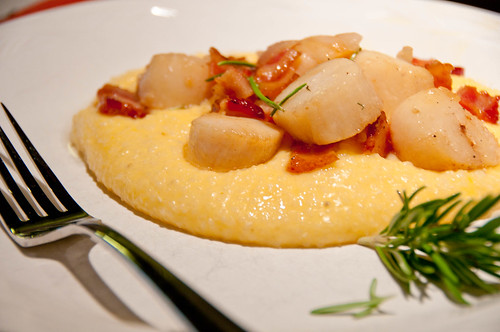
That's when I remembered one of his favorite dishes is Shrimp and Grits, but I knew I didn't have any fresh shrimp in the house. But I did have frozen scallops.

In 15 minutes, I went from a frazzled, "what in the world am I going to cook" to "I hope you like it."

And he loved it.


DSC_3270.jpg

Here's how you make it.


Rosemary Scallops and Grits

Ingredients
1 pound scallops
10 slices of bacon, chopped
1/2 cup onion, chopped
1/8 cup rosemary
1 clove garlic, minced
2 cups grits
4 cups water
2 tablespoons butter
2 cups shredded cheddar cheese
1/4 cup half and half

Step by Step

1. Chop bacon and cook on medium heat until browned. Add in chopped onion and cook until tender. Remove from skillet.

2. Boil 4 cups water and add grits. Cook about 5 minutes on medium, add in half and half, butter, and shredded cheese. Remove from heat and cover.

3. Add scallops to skillet used to cook bacon and onions. Cook 3 minutes on one side and then turn. Add bacon and onion mixture back to the skillet and add in minced garlic and rosemary. Cook 3 additional minutes.


All of these ingredients can be kept on hand for a quick and simple, delicious and satisfying meal for your family.

Enjoy!


Print

Friday, July 30, 2010

Favorite Posts I've Read This Week

Today I'm sharing a round up of some of my favorite posts I read this week. They are just too good to not share.


Ice Cream Pop-Tart Treats by Wenderly

This yummy looking recipe is sure to be a huge success with Little Buddy. I think this may quickly be his favorite summertime dessert.


Photo by Wenderly


Caramel Dipped Pretzel Rods by TidyMom

These are absolutely one of my favorite things to make for the holidays. They always seem to be well-loved at parties and appreciated in gift baskets. Seeing this recipe this week made me ready to start my holiday baking and creating.


Cocktail Cupcakes by Hoosier Homemade

When I saw these cupcakes that Liz made, I thought they were just too cute! Definitely a fun touch for a party or maybe even a reason to throw a party!


Day 2 on Building a Better Blog by Sprittibee

I love how bloggers you really love to read just really love blogging. It's not a job, it's not work. It absolutely has helped me to maintain my focus on what is important in my life.


Which leads me to....


In Memory of Ann (Recipe for Life) by Dine and Dish
Inspiring and so full of love, this post had me sobbing like a baby this week. The line, “This is not the kind of thing anyone should have to do alone,” stuck with me this week. 

I walked to a different tune after reading it. Thankful for each day I've been given. Even piles of laundry took on a new meaning.

Enjoy our days, make the moments count.


What are some of your favorite finds from this week?


Print

Wednesday, July 28, 2010

On the Grill :: Sharing Favorites and a Giveaway

Thank you so much to Stephanie of Bowmania for selecting the winner of last week's On the Grill. Congratulations to Amy of She Wears Many Hats! I agree with Stephanie, Amy's Grapefruit Lime Sorbet looks so cool and refreshing on these hot and sticky summer days.

 *****

This is the final week for On the Grill and I'm closing it in grand style with a giveaway of a $50 Amazon Gift Card!!!


Our Homeschool Home


Remember you can include recipes of foods that do not have to be cooked on the grill. You can include a favorite drink you serve, favorite side dishes, desserts, etc. You name it! Of course, you certainly can include items prepared on the grill! Anything you would serve at a cookout or BBQ is welcome!

Also, take a few  minutes to read over the On the Grill guidelines


How Do You Win?

The Judge will review your recipes and photographs which are linked up below. She will determine the Grill Master {winner}. The winner will receive the $50 Amazon gift card via email.

Be sure to include a link back to Our Homeschool Home. You are welcome to use the snazzy button in my top right sidebar or use a text link if you prefer.

In true cookout party style, be sure to visit the other blogs linked up to On the Grill. If you can't visit them all, at least visit the link ahead of your link and behind your link. In other words, mingle a bit.


When Does It End?

The link will close Sunday evening. Entries will be reviewed and the winner announced on Monday, August 2, 2010.


Print

It's a Froggy Hunt

My family loves a good scavenger hunt so when I was invited to participate in this fun Froggy Hunt with seven other bloggers, I quickly agreed!


Here is how you play.


1. Go to the Blog Frog Community and read the instructions on the Froggy Hunt.

2. Find Froggy on the homepage of my blog and then visit my Blog Frog Community. Leave a comment in the discussion thread for Did you find Froggy in my Blog Frog Community.

3. Visit these other awesome bloggers to increase your chances to win excellent prizes (giftcards, Blog Frog premium service, to name a few!).


Want to learn more about Blog Frog Communities? Come on over and visit my community and see what all Blog Frog has to offer.


Print

Tuesday, July 27, 2010

Cadillac Ranch

Making our way home on our RV trip, we made an overnight stop in Amarillo, Texas.

OHSH---3057.jpg

Home of Cadillac Ranch.


OHSH---3058.jpg


Cadillac Ranch is located in a open field off of Interstate 40 off of Frontage Road. Created by helium millionaire, Stanley Marsh 3 (he thinks III sounded too pompous), in 1974, the ranch is a tribute to the great American automobile and the historic Route 66 which passes through this area.

The display includes 10 Cadillacs positioned at the same angle as the The Great Pyramid of Giza, one of the remaining Seven Wonders of the World.

Open seven days a week, this graffiti laden art display is open to the public free of charge. Visitors are welcomed to enter the gate alongside the road and leave a bit of their "signature" on the display.


OHSH---3061.jpg

Sadly, visitors also leave a little bit more than just their signatures. We were disappointed at the number of paint cans and other trash left on the ground.

However, it seems to fit the display perfectly. So much so that in 1997 when the display was moved two miles to its current location due to urban sprawl, not only were the vehicles relocated, reportedly so were the paint cans and other trash.


OHSH---3060.jpg

We weren't quiet sure what to think about the debris and Little Buddy kept asking why anyone would want to litter like they'd done here.


OHSH---3050.jpg

And as we drove away, I was a bit in awe of Mr. Marsh 3. He certainly went out on a limb 25 years ago to create this work of art. And I felt a little bit more sentimental over antique Cadillacs and inspired by the man who had them placed with their noses in the ground.

If you ever find yourself along I-40 west of Amarillo, it's worth the 15 minutes to stop and see.


Sweet Shot Day

Enhanced by Zemanta
Print

Sunday, July 25, 2010

Mingle Monday :: Week 9

I'm excited about what I have in the works for this here little ole blog. I'm not entirely sure if I'm just making a big step forward or stepping straight off of a cliff. But, it's definitely going to be fun! I appreciate y'all for your encouragement. I'm still about five or six weeks away but definitely want to keep you all included in my news!

If you follow me on Twitter, you'll notice I've updated my Twitter "handle" to AddaPinch.  If you aren't already following me on Twitter, I sure would love it if you did.


This week, the featured blogger from last week's Mingle Monday is my buddy Amy from She Wears Many Hats Take a few minutes to go visit her as soon as you add yourself to the Mingle Monday linky. You'll thank me for it! I promise. No really, I PROMISE! You'll love her!

Remember, Mingle Monday is pretty simple and straight forward. No special blog posts to write, you aren't required to use the button, just add your blog and visit a few of the other blogs linked up when you can. I'm all for a simple summer!


Promote Your Blog!


Print

Saturday, July 24, 2010

Chocolate Covered Pretzels Meet Peanut Butter Pie

OHSH---3202.jpg


I knew they'd make fast friends. My favorite chocolate covered pretzels and my husband's favorite peanut butter pie. Too bad they aren't making friends with my hips.


Chocolate Covered Pretzel Peanut Butter Pie

Servings: Makes two 9" pies
Prep Time: 15 minutes
Cook Time: 0 minutes


Ingredients

2 cups chocolate covered pretzels, roughly chopped (reserve 1/2 cup)

4 tablespoons butter

1/4 cup sugar

pinch of salt


8 ounces cream cheese

2 cups confectioner's sugar

1 cup peanut butter

1 cup milk

2 cups whipped cream (reserve 1 cup)


Step-by-Step

1. Make pie crusts. Mix chopped pretzels, sugar, and melted butter together in medium bowl. Chocolate will begin to melt slightly. Mix until well combined. Press into two buttered 9-inch pie plates. Set aside.

2. Beat creamed cheese until fluffy. Add confectioner's sugar, milk, and peanut butter and continue mixing until creamy.

3. Fold in whipped cream and pour into prepared pie crusts.

4. Freeze until about 15 minutes before ready to serve.

5. Allow to thaw and top with reserved whipped cream and pretzel pieces prior to serving.


Now, please excuse me while I go walk on my treadmill for a gazillion hours.

This post is linked to Works for Me Wednesday at We Are THAT Family.

Print

Friday, July 23, 2010

5 Minute Floral Arrangement :: Crepe Myrtles

I love the look of fresh flowers. They immediately make the room look better. Almost as if the room has on its best dress ready for a party.


OHSH---3211.jpg


Sometimes, there just isn't time to run by the florist or even the grocery store to pick up a bunch of fresh flowers. And that habit can become a bit expensive, too.

As I sat on my back porch the other day, I could smell my Crepe Myrtles. Their sweet smell was just so refreshing and clean smelling.

I grabbed my snippers and a large glass vase and threw together a floral arrangement in five minutes.

Yes, five minutes.

Here's how I did it.


OHSH---3203.jpg

Start with a large, clean vase. I also recommend you make this arrangement outside to chase away any little friends that might be hanging out in these blossoms.


OHSH---3205.jpg

Remove bottom leaves from the stem so they are not in the water and begin arranging your stems of blossoms. Arrange the stems so they intertwine with one another for additional stability of the arrangement.


OHSH---3207.jpg

Continue arranging stems until the arrangement has reached the size and look you like. I included stems of blossoms that had yet to bloom. They add interest to the arrangement.


OHSH---3215.jpg

Fill your vase with fresh, clean water.


OHSH---3218.jpg


My kitchen now smells beautiful with the light scent from the crepe myrtles. The blooms do tend to fall easily, so be ready to pick up a few each day. But the result is so worth it.


And even better... my kitchen now is all dressed up for the weekend.


Print

Thursday, July 22, 2010

On the Grill :: Sweet Potato Fries

This week for On the Grill, I'm sharing one of my very favorite sides for any cookout.

Sweet Potato Fries

I love good sweet potato fries. No, like I really LOVE sweet potato fries.

It's really pretty crazy how much I love them.

If we find a restaurant that serves them, I pretty much will forgo the entree part of the meal and order a large order of these little bits of deliciousness.

Have you ever tried them?

Well, I've learned how to make them at home.

OHSH---3195.jpg


Making them at home saves my family the embarrassment of my voice getting 10 pitches too high when I read the menu and persistently tell my family I'm getting the sweet potato fries.

Doh! I think they could guess that already.

So back to my learning how to make them at home. I'm not sure why I'm just discovering how to make them for myself. They are fairly simple to make.

Here's how I do it.

First preheat peanut or canola oil in a fryer to approximately 350 degrees.

OHSH---3179.jpg

Peel and wash one sweet potato per person you will be serving. If mainly hungry men, go ahead and plan on one and a half potatoes per person. You'll be glad you did.


OHSH---3183.jpg

Cut the potato into strips. Personally, I prefer to cut the potato in half and then slice one half of the potato into medium size slices. Then, turn the potato on your cutting board and cut the same slice again for perfect fries.


OHSH---3186.jpg

Throw the cut potato into the basket of your fryer with the basket outside of the hot oil. Make sure the temperature of the oil has reached 350 degrees before lowering your potatoes into the oil. Otherwise, you'll wind up with limp, soggy fries. Bleh!

To test the temperature, just lower a candy thermometer into the oil to verify. You'll be glad you made this important little step!


OHSH---3185.jpg

Cook for approximately 3 minutes in the hot oil until the fries have reached a bright orange, crispy look.


OHSH---3184.jpg

Remove to a bowl lined with paper towels for draining. Immediately sprinkle with salt. I personally prefer sea salt on my sweet potato fries. It makes all the difference.


OHSH---3195.jpg

Serve as a side to your favorite grilled hot dog, chicken, hamburger, or if you'd like... all by themselves. Yep, they are that good!

Enjoy!


Sweet Potato Fries

Ingredients
Sweet Potatoes, peeled and sliced
Peanut or Canola Oil, heated in fryer to 350 degrees
Sea Salt

Step by Step
1. Place fries in fry basket outside of the hot oil. Lower gently.

2. Cook fries approximately 3 minutes, until bright orange and crispy exterior.

3. Remove from oil and place into paper towel lined bowl for draining.

4. Add a pinch of sea salt to taste. Additional seasonings to try are Mrs. Dash and cinnamon sugar.


***** 


On the Grill
Congratulations to Carla of Recipe Addict for being the winner of last week's On the Grill. Please send me an email so I can send you your I'm a Grill Master Button!


This week's Guest Judge

This week's guest judge is my friend, Stephanie of Bowmania.


Our Homeschool Home


Remember you can include recipes of foods that do not have to be cooked on the grill. You can include a favorite drink you serve, favorite side dishes, desserts, etc. You name it! Of course, you certainly can include items prepared on the grill! Anything you would serve at a cookout or BBQ is welcome!

Also, take a few  minutes to read over the On the Grill  guidelines


How Do You Win?

Our Guest Judge will review your recipes and photographs which are linked up below. She will determine the Grill Master {winner} for the week. The winner then receives a special button to display on your blog or site.

Be sure to include a link back to Our Homeschool Home. You are welcome to use the snazzy button in my top right sidebar or use a text link if you prefer.

In true cookout party style, be sure to visit the other blogs linked up to On the Grill. If you can't visit them all, at least visit the link ahead of your link and behind your link. In other words, mingle a bit.


When Does It End?

The link will close Sunday evening. Entries will be reviewed and the winner announced at next week's On the Grill party. And yes, you may enter more than one post. You will need to make sure each post entered meets the guidelines.



Enhanced by Zemanta
Print

Wednesday, July 21, 2010

Savvy Blogging Summit 2010 - Audio Recordings Available

Wishing you'd been able to attend the Savvy Blogging Summit in Breckenridge, Colorado? Well, now the fabulous ladies who coordinated this wonderful learning event are making the audio recordings made during the summit available!


While I fully recommend the entire suite of recordings, they are allowing you to download individual courses as you'd like at $10 each.

What a sweet deal!

Just think, you don't have to look for sponsorship, pay for flights, hotel or meals and are able to learn exactly what we all learned from the comfort of your home --- in your jammies even!

Simply click on the link below to be directed to the Savvy Blogging Summit download page.


Oh, and if you hear a really Southern Belle (aka: twangy) sounding accent, that's totally not me. {sigh}


The Savvy Blogging ladies are allowing previous attendees to offer these recordings under an affiliate link.
Print

10 Minute Dessert :: Sopapilla Crunch

When my husband and I were dating and then first married, there was a Mexican restaurant in our town that we loved.

When I say loved, I really mean it. We ate there at least once a week and sometimes more times in a week than I care to admit. Unfortunately, they closed a few years before Little Buddy was ever born. But we still talk about their food.

They served the best cheese dip, the best chicken and artichoke dinner, and their sangria was... yum. Thankfully, my husband is able to recreate their sangria.

But my very favorite thing they served from their menu was called Sopapilla Crunch.


OHSH---3147.jpg


Here's how I recreated their Sopapilla Crunch. It's now Little Buddy's favorite dessert.


OHSH---3117.jpg

Cut a large flour tortilla into strips. I cut three tortillas because I was making this for a crowd. Just note that one tortilla is enough for one final plate of Sopapilla Crunch so you can adjust accordingly.

All of my directions will be for making one plate of this deliciousness.


OHSH---3120.jpg

Melt two tablespoons of butter in your iron skillet over low to medium heat.


OHSH---3123.jpg

Place tortilla strips in skillet and brown for approximately 2 minutes. Adjust your timing to your stove and flip it over as soon as strip begins to puff a bit.

You'll want to get both sides of these babies nice and crispy.

Repeat until all strips have been cooked. 


OHSH---3142.jpg

Remove from skillet and place it decoratively on your plate.


OHSH---3143.jpg

Now drizzle honey over the strips.

Don't be stingy with the honey. It makes it so yummy!


OHSH---3144.jpg

Now sprinkle some cinnamon sugar on it.

Doesn't it already look delicious?

But just wait. It gets even better!


OHSH---3145.jpg

Now add three scoops of good vanilla ice cream to the center of the strips.

{I see you drooling! Hold up, more to come!}


OHSH---3147.jpg

Finish it off with another good drizzle of honey and then a dusting of confectioner's sugar.


Your welcome.


Sopapilla Crunch Dessert

Servings: 2  or more
Prep Time: 5 minutes
Cook Time: 5 minutes


Ingredients

1 flour tortilla, large

2 tablespoons butter

vanilla ice cream

honey

cinnamon sugar

confectioner's sugar


Step-by-Step

1. Cut tortilla into strips.

2. Melt butter in skillet. Add strips to melted butter on medium to low heat.

3. Cook until lightly browned and crispy on each side.

4. Place cooked strips on serving plate.

5. Drizzle with honey and sprinkle with cinnamon sugar.

6. Add three scoops of vanilla ice cream and top with another drizzle of honey and sprinkle of cinnamon sugar.

7. Serve immediately.


It is best to serve this with the tortillas freshly cooked. However, I have cooked these ahead for dinner parties and then assembled for dessert.

A variation of this dessert is to serve a few strips of the sopapilla with a bowl of ice cream drizzled with honey and sprinkled with cinnamon sugar and confectioner's sugar.  This works well for a large crowd.


Print

Tuesday, July 20, 2010

Road Trip :: Fort Hays, Kansas

Driving through Kansas, we were absolutely blown away by the breathtaking views. Wide vistas as far as the eye could see.

We had planned a short excursion off of the interstate to visit Fort Hays.

OHSH----7.jpg

Fort Hays was established in the 1800's (1867-1889) for the purpose of housing soldiers to guard the railroad as it passed through the area, serve as a supply depot for the other forts in the area, and defend settlements.


There are four building remaining on the historic site. 


OHSH---1-17.jpg

Two of the officers' homes have been returned to the site. They have been decorated with period furnishing showing how the officers would have lived at the time.


OHSH---2394.jpg

The third building remaining on the site is the guardhouse which included cells where prisoners were retained.


OHSH----3.jpg

Little Buddy didn't want me to get close to the cells though. I'm not sure if he thought I'd get locked inside or what.


OHSH----5.jpg

As ornery as he was, he did get even more upset when he saw that people had carved their names into the limestone. He's pretty much a stickler for that kind of stuff. {Which makes this Mama happy!}


OHSH---2408.jpg

We visited the blockhouse, again made from the gorgeous limestone.


OHSH---2410.jpg

But I loved the inside ceiling structure as much as the limestone. Beautiful.

Yep, I'm a building nerd. I guess that comes from living with my architecturally-degreed, not working as an architect husband, huh?


OHSH---2416.jpg

And then we visited the buffalo statue on the front lawn.

As we walked the grounds, it was mind boggling to realize legends like Wild Bill Hickok, Buffalo Bill Cody, Lieutenant Colonel George Armstrong Custer, and the famous buffalo soldiers walked in this same area we were now walking. They lived in these homes, visited this guard house, looked at the same blockhouse. They lived here.

And then, the gentleman providing us with the history of the fort told us,  "This is also a site in the film Dances with Wolves."

Now, y'all know I immediately started thinking about Kevin Costner don't you?

I did. I admit it.


OHSH---2342.jpg

We walked across the highway to see the beautiful buffalo.


OHSH----8.jpg

The big fella wasn't that interested in us.


OHSH---2347.jpg

But this cutie must have thought we were pretty interesting.


And he's the one Little Buddy wanted to bring home. We convinced him he needed a smaller souvenir.


Sweet Shot Day


Print